Thursday, December 9, 2010

Experimenting with Gesso

this card, though not of the season... still got created for some reason because i was experimenting with Gesso... yup!! this simple medium can create wonders friend!!! i love the textures it gives to the project. (for anyone who doesn't know about Gesso, its a primer that is used for canvas, wood, metal, plastic etc.. mostly its available at craft stores, mine is from Claudine Hellmuth Studio)

for starters, layer Gesso medium on a white card stock. i used a pallet knife for this but i think u can use a scrapper or some item with smooth edge. layer the gesso well in a sort of an uneven thick paste. you'll need to let it sit for a while until it gets dry. Gingersnap Creation is having a new color challenge called the vintage hues so i added the vintage effects to this with acrylic paints. below is a close up.

now, for the actual card... i used Tim Holtz's Rock Star stamp with acrylic paint... this is a little tough to get with all that texture.. so in some areas i had to repaint over the stamp... then i added, 4 eyelets on each corner, took some wire and attached it. i then layered this piece on another card which is inked (walnut stain, vintage photo, fired brick) and sprayed (tsukinke - walnut ink) Finally, added the ribbon and painted word "cherish"(from making memories slice machine)

Wednesday, December 8, 2010

SNOW!!!


i'm back with SNOW!!!! well, actually since i live in the tropics there is absolutely NO snow... i do get to enjoy it when i step out of my country once in a while... however, this week many of the blogs have put up challenges with regard to snow or snow people... so i wanted to join in the fun!!!

i have used LORD T!M's addictive distress inks (Tim Holtz Distress Ink (THDI) vintage photo, walnut ink, fired brick) to create the background and have stamped it with letter stamp (THDI - aged mahogany). i found a really cool vintage effect snow man and affixed that on the card. then cut out a 'snow' word off of the my favorite machine the making memories slice and inked it glittered it (broken china, chipped sapphire - THDI & Broken China Stickles) . after layering that then i stamped 2 snowflakes inked with the paint dabber (Adirondack Paint Dabber - Aqua).

Hope you like my creation.. and i hope you will join in the fun to celebrate the season with a little bit of SNOW!!!

I have entered this card to following challenges:

Gingersnap Creations - Snowpeople
Gingersnap Creations - Vintage Hues
Simon Says Stamp & Show - Hoilday Greetings
City Crafter - Let it Snow
Moxie Fab World - Card Creations - All Occasions

Saturday, November 27, 2010

A Vintage Christmas


i thought i'll add my final design for this week...'cause i'm off on holiday for a week... Yippeee!!!!


the background is done with Tim Holtz's Double Distress technique. i added some chunky glitter to give a little sparkle. and keeping with the theme no red or green, i thought i'll contrast the background with blues. the wording is done with blue acrylic paint with little glitter & gold paint. the bauble is done with another Tim Holtz technique using crackle inks and alcohol inks. finally, add the lace and the ribbons.


a close up

things i used:
Marvy Uchinda bubble embosser
Chuncky Glitter (brown)
Lace and ribbons
Tim Holtz Crackle Paint - broken china
Adirondack Alcohol Inks - Pearl
Making memories slice machine - words and expressions

see you next week... enjoy!!!!

Thursday, November 25, 2010

Styling with Couture


this is the card for Gingersnap Creations - Chestnut Theme Challenge - Haute Couture. i saw this really cool couture design by John Galliano. so i thought i'll do my thing... & this is what i came up with...

i distressed the card with Tim Holtz's Distress Inks (victorian velvet, aged mahogany) & stamped with swirls. then i used a written patterned paper and adhered it on to a tag. i used a colored twine thread and instead of an eyelet, i used a button up side down. the tag is inked and embossed gold wording "always" is affixed. then i used an iced gold cardboard to stitch on. finally add everything together with the lace and Voila!!!

Things i used:
Tim Holtz's Distress Inks - victorian velvet, aged mahogany, vintage photo, tea dye & walnut stain
Printed paper
Metal button
Colored Twine
Embossed Wording
Lace

Challenges i entered:
Gingersnap Creations - Random Redhead Challenge - Stitching
Simon Says Stamp and Show - Distress Inks

The Shabby Tea Room - Pick a cause (my cause is "all in the name of fashion")


I hope you like my design...

Sunday, November 21, 2010

Tuesday Trigger: Moxie Chic


this is the inspiration image from the Tuesday Trigger: Moxie Chic of Moxie Fab World. so i did my thing and created this;


the background was created using Cardmaker's Creative Pack (classic). being inspired by the ruffles on the blouse i attached 2 colors of ribbons and added rhinestones on it. then cut out 'love' from slice machine and outlined it with silver outliner and left it to dry. then i stamped 2 hearts on a black shimmer paper and clear embossed it. i really love the effect i got from clear embossing. take a look at the close up.


Hope you like my creation...

Tuesday, November 16, 2010

DT Call

There is a DT Call over at Fussy and Fancy Challenge blog... so i thought i'll try my luck... they want us to publish our favorite 3 cards... so here goes:

Design 1

this card is a fairly simple design.. but love its classiness with the lace and everything...


Here is a Close up


Design 2:

i did this card with lot of colors, mainly using Tim Holtz Distress Inks: first i blended Mustard Seed, Spicy Marmalade.. then i used a sponge to get the textures of distress with Aged Mahogany, Peeled Paint... then i added some gold embossing powder and heat embossed it. afterward i layered it on another card and added the ribbons and flower.


A Close Up

Design 3: this card is from one of my earlier blogs: All Zipped up in Fall


i hope you like these designs... Thanks!!!

Sunday, November 14, 2010

Lavender Blooms


i want to enter in to the Shabby Tea Room - Lavender & Lace challenge... i did this card over the weekend and today is the only day to enter.. so here goes.


the inspiration image

first i created the lavender flowers: i cut out card board that has the shape of lavender sprigs and then applied an embossing paste unevenly. then colored using 2 shades of purple metallic paints.

to create the background, i used Tim Holtz blended batik technique from his new book compendium of curiosities - this gives the card more of a vintage look without the grunge colors. and then i added layered an ice gold card board and pasted the lavender sprigs.. on that i drew the stems using an outliner. then i added a ribbon and a ruffled lace and the sentiment with lilac pearl shade.


here is a close up of the embossed lavender

things i used:
Tim Holtz Distress Ink (Dusty Concord, Clear)
American Crafts ZING (Clear)
Stampabilities - Star spangled Background stamp
Faber- Castell (Lilac Pearl Shade Outliner, Sap Green Outliner)
Purple Ribbon
Lace

Challenges i entered:
Prairie Fairy Designs - Make your own flowers
Kaboodle Doodles Challenge Blog - Make it vintage
If the shoe fits scrap it - DIY Challenge

Hope you like my creation...

All Zipped up in Fall


this card is an inspiration from the Moxie Fab World - Tuesday Trigger - Fall Festival and Moxie Fab World Challenge - All Zipped Up. Let me show you few pictures to get an idea;


This is the Tuesday Trigger - The Fall Festival


There are many images.. but this really hit me; if you want to be inspired then click on the link above

So i was browsing through Moxie Fab World and saw these images and it hit me... Eureka!!!!! i thought why not make my own flowers using zippers... so i used the color combo from fall festival image and created this card.

i made the flowers using only one side of the zipper so the grove of the zipper will add more texture. you can use about 12 inches for the large flowers and 6 inches for the small one. in order to make them, you got to remove the zipper holder and take it apart, then you need to get ruffles, for this start from one corner and run a stitch along the edge and gather. now you have to start rolling it up... start with a small bud and keep rolling until you have rolled the entire strip. (tip: while rolling i stitched the flower from the bottom to keep it secure and the end was tucked under and stitched)

after making the flower i added a pearl in the middle. the card first covered with a creamy gold paper and then inked with Tim Holtz Distress Ink and the leaves are embossed in different colors with Tim Holtz Distress Powder. instead of a ribbon i used another zipper (brown) and added a sentiment Thanks with Tim Holtz Crackle Paint and Stickles. as a final touch i scrapped the edges and used gold beads to add more texture and give that beautiful glamor that is in the fall. here are few close ups;


I hope you like my inspired card... i really did enjoy making this... leave me a comment on what you think of it...

Things i used;
Tim Holtz Distress Inks (Spicy Marmalade)
Tim Holtz Distress Powder (Spicy Marmalade, Shabby Shutters, Pine Needles)
Tim Holtz Distress Crackle Paint (Spicy Marmalade)
Tim Holtz Distress Stickles (Peeled Paint)
Orange, Light Yellow, Light Orange and Light Brown Zippers
Inkadinkado Fall Leaf Stamp
Making memories scrapper
Gold Beads

Challenges i entered:
City Crafter Challenge Blog - Thank you
Prairie Fairy Designs - Make your own flowers
Daring Card makers - Topaz Challenge
Gingersnap Creations - Sewing Notions
Gingersnap Creations - Color Challenge
Opus Gluei - An attitude of gratitude
Creative card Corner - Let's give thanks
Cute card Thursday - Anything goes

Saturday, November 13, 2010

Let it snow with Perfect Distress


This is my card for the Compendium of Curiosities Challenge over at Studio L3... it's from Tim Holtz new Book - Compendium of Curiosities, which truly is an inspiration... Studio L3 has started this wonderful challenges based on Tim's book and this weeks challenge is on the pg 38 of of the book - Perfect Distress. if you want to know more about the technique.. hop over to Tim's Demo page or purchase the book on his web page.

On with the challenge, the background of the card is inked with Tim's distress inks - Tumbled glass... sprinkled with water and dried. then i used a snowflake stamp and did the perfect distress on it using Perfect pearl - turquoise. i cut out 2 snowflakes (i couldn't find anything that will go for the card, so i went DIY) , in one i spread glitter... and the other i first used a blue glitter stickler and then used a turquoise outliner to get the 3D effects. then i cut out wordings from making memories slice machine (words & expression chip) and glittered it using sticklers. then embellished with two nail heads for extra effect.

here is a close up

Things I used:

Peddler's Pack Stampworks - Snow flakes background
Perfect Pearls - Turquoise
Silver Glitter
Blue Sticklers
Making memories Slice Machine - Words and Expressions
Turquoise out liner
Blue Nail heads

Challenges i entered;
Paper Sundaes - Let it snow
ABC Challenge - H for Hoilday
CCEE Stampers - Winter Scene
If the shoe first - DIY challenge
Flourishes Newsletter - Timeless Tuesdays
One stitch at a time - Winter Wonderland

Thanks!!! I hope you enjoy my creation...


Thursday, November 11, 2010

Journey

there is a wonderful challenge over at Simon says Stamp & Show blog to pick out your favorite Tim Holtz Stamp and make a creation. if you ever wanted a tough challenge, then this is it... HOW TO PICK YOUR FAVORITE TIM HOLTZ STAMP?@#$%^&*!!!
well i don't know about favorite but i love his Rock star collection because of its cool, funky effects...

i made this card by placing Tim's masks - timeworks collection all over the card.. then inked it using Tim's Distress Inks. (All hail Tim for his wonderful inks - 'cause i don't know what to do without them) i haven't used the dusty concord in a while, so i thought I'll give it a try... together with mild lavender, broken china and chipped sapphire. I've seen Tim just spray water all over his tags... so did that!!! check out the wonderful effects i got... then i took out a nice metallic gold and sprayed it over with a brush. now that i've got this wonderful background... used Tim's stamp with Adirondack Pith Black to stamp the city skyline. then i punched out some stars and used one of my favorite techniques - Chunky Glitter Wordings. here are some close ups!!!


Things i used:
Tim Holtz - Masks - time works
Tim Holtz - Distress Inks ( dusty concord, mild lavender, broken china and chipped sapphire)
Tim Holtz - Stamps - Rock Star
Adirondack Earth tones - Pith Black
Metallic Gold Ink
Journey sentiment - Making memories slice - Words and Expressions
Turquoise blue Chunky glitter

well, i hope you like this creation... Leave me some love....

Tuesday, November 9, 2010

Mighty White


This is my creation for the Challenge #15 of Creatalicious Challenges blog... i had to edit the background since i took the photo in a white background... yea i know!!!

anyways this card is done on a beautiful ice gold paper and a heart design lace is added to highlight the white chunky glitter hearts. since i couldn't find any stickers like this in a store.. i did this by hand... its a little difficult since you tend to get glitter all over you... but i think it's worth the effort. so going back to the technique..

cut two hearts out of card stock (which ever shape or size is fine... as long as it fit well with the card) if you notice i have done the two hearts in different shapes and sizes. now the hard part.. first apply a thick layer of glue (tip: its best if you can use some hard type of glue) then spread the white chunky glitter. leave it for a while to dry (tip: its best if you can add a little pressure while it gets dry) see what falls off and add some glue to those areas and spread the glitter again... (tip: best if you can finish this off in 1-2 processes, otherwise the hearts will have too much of an unevenness. after drying affix the hearts to the card. below is a close up.


Hope you like what i have created; appreciate your comments... they are truly encouraging...

Sunday, November 7, 2010

My heart felt gratitude

this card presents a heartfelt gratitude to a friend... since i love working with embossing powders i designed the background with 2 different colors... the heart was done by coloring with 3 shades of pink colored pencils which adds a different distress look... then stamped with swirls. then affixed it to the card, cut card in to heart shape... using embossing powders spread it across the card stock, using a heat tool heat the powders until melted. to finish up add the ribbons and a safety pin.


a close up

Things i use:
Pipe Dream Ink, Embossing powders: Rosevears & Eucalypt
Pink and Green Ribbons
Green Safety Pins (Baby collection)
Pink Color pencils
Tim Holtz Distress Inks (Peeled Paint)
Swirl Cling Stamp


The Challenges entered;
Our Creative Corner - An Attitude of Gratitude
Oldie But a Goodie - Distressing
Raise the Bar - Let's See those curves
The Crazy Challenge - Pearls & Swirls


Thursday, November 4, 2010

Graduation with a difference

this design is actually a card designed for a graduation of a friend... i didn't want to do the same old graduation cards with the hat and scroll... so i did this.. the paper used has an old Chinese script as the design and distressed it with a sanding block. i used a feather and attached a hand cut nib. i love the effect it creates with the lace and the intricate gold designed button...
Things I used;
Chinese craft paper
Lace
Feather
Gold Button
Sanding block by Making memories

Tuesday, November 2, 2010

Christmas Surprise


most of us always thinks that a Christmas card should not have a grunge look... but check this card... i was inspired by Tim Holtz 12 tags for Christmas. i created this card using his very unique distress inks and masks. first i used Tim's Masks to word out "Merry Christmas" then i inked the card... then splattered the whole thing with water. then using the making memories scraper i distressed the edges. (make sure the water has evaporated from the card... if you are impatient like i am.. best method is to use a soft tissue and then heat dry using a heat tool) embellished with a ribbon and some silver snowflakes.

Things I used:
Tim Holtz Distress Inks (tea dye, vintage photo, fired brick & peeled paint. 
Scrapper from Making memories
Green Transparent Ribbon
Fabric Snowflake (silver)

Monday, November 1, 2010

Fun with Crackle

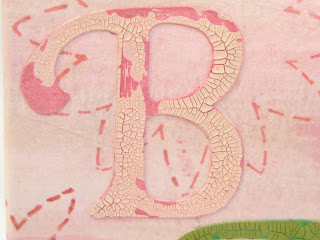
Tim Holtz Distress Crackle is one of my favorites among Tim Holtz's many products... i have used it to create this card. The card is painted with pink water colors showing the brush stokes.. then i drew the flowers and swirls with a metallic pen. then i cut out letters from Making memories slice machine and painted it with metallic ink. then used the distress crackle paint on top.


Things I used:
Tim Holtz Distress Crackle Paint (Tattered Rose, Peeled Paint)
Metallic paint (Pink, Green)
Metallic pens (Pink, Green)
Pink Water color

Sunday, October 31, 2010

Creative with fusible fibers

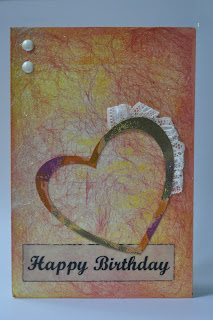
I love to find new things; i did this design couple of years ago with fusible fibers... you got to do it according to the manufacturers specifications... but you can add your own colors and your own design... so i used it as a background to my card... first i inked the card, then pasted the fusible fibers over the card. cut out a heart and used embossing powders and crackle paint to give more effect. Then i attached a piece of lace ribbon on top of the heart. To finish off i choose a vellum print with 'Happy Birthday'.

Things I used:
Fusible Fibers by Crafty Notion (www.craftynotion.com)
For this design I used their Raspberry Sparkle & Peacock from the Angelina Collection
Distress Ink by Tim Holtz (Mustard & Spicy Marmalade)
Distress Crackle Paint by Tim Holtz (Antiqued Bronze)
Embossing Inks by American Crafts Brand Zing (Purple & Gold)
Lace & Vellum

Saturday, October 30, 2010

Diggin' on Damask challenge in the Moxie Fab World

This is the card i wanted to present to the damask challenge "Diggin' on Damask challenge in the Moxie Fab World"  the damasks are created in hot yellow and cool grey to give it a mix.
I used dark grey card stock and cut out 4 damask designs from "Making Memories Slice" and inked it in a light grey colour. then i added Zing embossing powder - mustard (i added the powder with little areas showing grey to get a distress effect). i layered the yellow ribbon center of the card stock, then pasted the damasks to create a diamond shape... cut off the access piece of damask and finish it off with a large yellow button and a silver ribbon bow. i have also added a sentiment of silver thanks!


Things i used: 
Dark grey cardstock
Making Memories Slice - Basic 3
Momento - Dew Drop -London Fog
Yellow Transparent Ribbon
American Craft - Zing - Opaque Finish - Mustard
Yello Button - Large
Silver Ribbon
Silver Pen

Friday, October 29, 2010

My First Blog

For my first blog, I thought I would introduce one of my special cards...


To create this was all art... much painting and stamping...

Things I used: 
Stamps from: Inkadinkado, Stampscapes inc., Stampabilities
Tim Holtz Distress Ink - Fired Brick & Aged Mahogany 
Memento - Londaon Fog (Grey)
Thin Tipped black Pen
White Water Color   

First I painted a butterfly, then inked the card in gery
Stamped it with 3 different stamps
Then using a black thin tipped pen i designed the vintage flower design
Using a thin paint brush and white water color design another on top
Keeping one hand secure with another brush on bottom of the other (this holding the white water color) drizzle the ink in any way you feel (pl. ensure you don't have any thing on your work table... this is really messy)
To finish up embellish the center with the beautify butterfly
A little Close up